
Where to Place a Radon Test: Best Locations for Accurate Results
Radon testing is simple, but placement matters. A properly placed test gives you a meaningful result that reflects the air you actually breathe. A poorly placed test can understate or overstate your radon level and lead to the wrong decision.
This guide explains where to place radon tests in a home, where not to place them, and how placement rules change for finished basements, crawl spaces, multi-level homes, and real estate testing.
The most important rule: test the lowest lived-in level
The most widely used guidance is to test radon on the lowest level of the home that is used regularly. Radon typically enters from the soil under and around the foundation, so levels are often higher closer to the ground.
What counts as the lowest lived-in level depends on how you use your home:
- If your basement is finished and used as living space: test in the basement.
- If your basement is unfinished but used frequently: test in the basement.
- If your basement is not used as living space: test on the lowest level above it that is lived in regularly, such as the first floor.
- If you have a crawl space: test on the lowest lived-in level above the crawl space, usually the first floor.
A simple way to decide is this: test where people spend time and breathe indoor air. Do not test in a level that nobody uses and then assume that number represents your real exposure.
Choosing the best room on that level
Once you pick the correct level, choose a room that reflects typical living conditions. Good choices are rooms where people spend time for hours at a time, such as:
- Family room or living room
- Bedroom
- Office or workspace
- Finished basement entertainment area
If you work from home in a basement office or you have a basement bedroom, that is a strong candidate for test placement because it reflects high time-in-room exposure.
Distance and placement basics
Most test kits include placement instructions, and you should follow those first. In general, common guidance includes these placement basics:
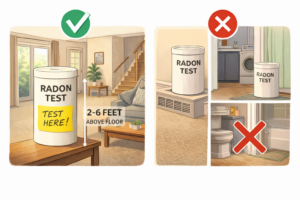
- Place the device at least 20 inches above the floor and typically within the breathing zone range (about 2 to 6 feet above the floor).
- Keep it away from exterior walls and drafts when possible.
- Keep it away from windows, doors, and vents.
- Keep it out of direct sunlight.
- Do not place it where it may be disturbed by pets, children, or normal activity.
The goal is to avoid unusual airflow patterns and heat sources that can skew the reading.
Where NOT to place a radon test
Bad placement is one of the main reasons people get confusing results. Avoid these locations:
- Kitchens (temperature changes, exhaust fans, airflow)
- Bathrooms (humidity and ventilation)
- Laundry rooms (humidity and airflow)
- Near sump pits, floor drains, or crawl space openings unless you are doing diagnostic testing
- Near fireplaces or wood stoves
- Directly next to HVAC supply or return vents
- On the floor or directly against an exterior wall
- In closets or tiny enclosed spaces unless specifically instructed by the test protocol
These areas are more likely to have unusual airflow, humidity, or temperature swings that do not represent typical breathing-zone air.
Finished basements and walk-out basements
Finished basements are a common location for higher radon levels because they are close to the soil. If the basement is used as living space, testing there is strongly recommended.
If you have a walk-out basement, radon can still be elevated. People sometimes assume a walk-out basement is naturally ventilated and therefore safe. That is not guaranteed. Test in the rooms where people spend time, not based on assumptions about layout.
Multiple tests in the same home
Many homeowners use one test as a starting point. In some cases, multiple tests make sense:
- You have a large home with multiple wings or separated living areas.
- You have a basement that is used heavily and also a first-floor bedroom that is used heavily.
- You want to understand variation between rooms, especially if you plan to renovate or add bedrooms in lower levels.
- You are using a continuous monitor and want to compare areas of the home.
If you use multiple tests, start with the lowest lived-in level and then expand to other frequently used areas if you want more detail.
Real estate testing placement
Real estate radon testing is often performed under time constraints and may follow specific protocols. In general, testing is performed in the lowest level of the home that could be lived in, even if it is not currently finished, depending on local practices and the purpose of the test.
If you are testing for a home purchase, ask where the test will be placed and why. A result from a storage basement that is never used tells you less about real-world exposure than a result from a finished basement family room. At the same time, real estate testing often aims to evaluate the lowest potential living area because it is the most likely to be elevated.
Closed-house conditions and why they matter
Many short-term radon test protocols use closed-house conditions, meaning windows and exterior doors stay closed except for normal entry and exit. This reduces variability and helps capture a consistent result under typical enclosed conditions. The exact timing requirements can differ based on the test method and guidance.
If you leave windows open during a short-term test, your reading may be artificially low. That can lead you to believe radon is not an issue when it actually is under normal closed conditions.
Placement tips for digital radon monitors
Digital radon monitors are popular because they provide ongoing data. Placement rules are similar, but there is one extra caution: do not chase daily changes. Short-term averages can swing. If you use a digital monitor, pay attention to longer averages such as 7-day, 30-day, or longer trends, depending on what the device provides.
To use a digital monitor well:
- Place it in the lowest lived-in level first.
- Leave it in one spot long enough to build a meaningful average.
- If you move it, understand that the reading resets to the new location and needs time to stabilize.
A simple checklist for correct placement
- Choose the lowest level that is used regularly.
- Select a room where people spend time.
- Place the device 2 to 6 feet above the floor.
- Keep it away from windows, doors, vents, and exterior walls.
- Avoid kitchens, bathrooms, laundry rooms, and high humidity areas.
- Follow closed-house guidance for short-term tests.
- Do not disturb the device during the test period.
Bottom line
Where you place a radon test directly affects whether the result reflects your true exposure. The best approach is to test the lowest lived-in level, choose a normally occupied room, and avoid drafts, vents, and high humidity areas. If you follow these basics, your test result will be far more useful for deciding whether mitigation is needed.
Sources
- U.S. Environmental Protection Agency (EPA) – How to test your home for radon
- U.S. Environmental Protection Agency (EPA) – EPA action level for radon and what it means
- EPA – A Citizen’s Guide to Radon (PDF)
- Centers for Disease Control and Prevention (CDC) – Testing for radon
- National Radon Program Services (Kansas State University) – Radon education